How to install fireplace inserts is one of our top questions we receive. Fire place inserts convert wood burning fireplaces to an electric or gas log fireplace. Once fireplace inserts are installed, the existing chimney will not longer need aggressive cleaning. The only maintenance for the inserts is a chimney sweep once a year.
Over time, a traditional wood-burning chimney builds up soot. If not cleaned regularly by a professional chimney sweep, this build-up can start fires. Many families choose gas logs or electric fireplaces to maintain the look and feel of a fire as our homes are modernized.
When Should You Install a Fireplace Insert?
Installing a fireplace insert can be a savvy decision if you own an existing masonry fireplace that’s outdated or inefficient. Here’s when you should consider an upgrade:
Cost Efficiency: If you want an affordable alternative to remodeling or replacing a traditional fireplace, inserts are a great option. They offer a cost-effective way to breathe new life into your old setup.
Improved Efficiency: Are you concerned about energy efficiency and cleaner air in your home? Inserts provide a more fuel-efficient burn and reduce smoke emissions compared to open fireplaces, making them a greener choice.
Existing Venting System: With a masonry fireplace, you already have a built-in venting system, as inserts utilize the existing chimney, which can simplify installation.
DIY Possibility: For those who enjoy DIY projects and have a flair for carpentry, installing a fireplace insert might be within reach. No specialized tools are needed for the basic assembly. However, expertise in working safely on a ladder or roof is necessary for this task.
Electrical Needs: Remember, though, that you’ll need a power outlet within the old fireplace. Unless you’re a certified electrician, you’ll need to hire one for this part of the installation.
Consider these points if you’re ready to enhance your fireplace’s performance and style.
However, if you’re considering a fireplace insert, several safety considerations are crucial to ensure a secure installation and operation. Firstly, measure the exact height, width, and depth of your fireplace opening. This ensures the insert fits perfectly, as each brand and model has its own specifications and safety criteria.
Safety Guidelines
Manufacturer’s Instructions: Follow the manufacturer’s guidelines to avoid potential fire hazards. Understanding the required safe distance from combustibles is essential before purchasing and installing the insert.
Ventilation: Proper ventilation is critical. Ensure all necessary vents are installed correctly, which may involve working at high elevations. Always work in favorable weather conditions and use non-slip footwear for added safety.
Stable Setup: When setting up a ladder or any equipment, ensure it’s on stable ground to prevent accidents.
By blending traditional charm with modern safety standards, you can enjoy the warmth and ambiance of a fireplace without compromising on safety.
Many vendors offer remarkably real gas logs. Also, some have remote controls and thermostats to regulate the temperature in the home.
Important steps to install an insert:
When we are asked how to install fireplace inserts, we inform them in order to convert a wood burning fireplace into gas logs or a vented fireplace, there are several steps to take:
The most important first step is a chimney sweep by a professional (do not go past this point until it is done!)
The old fireplace grate is removed and recycled.
The chimney professional will inspect and repair any fire brick and defects in the masonry.
A fireplace insert is installed. This insert is lowered from the chimney top or in some cases pushed up through the chimney, ensuring a snug fit within the existing structure.
Begin by attaching the vent adaptor to the end of the flue vent liner. Lay down a piece of scrap cardboard to protect hardwood or tile surfaces in the hearth area while maneuvering the insert. Place the insert on the cardboard to prevent any damage.
The insert is cut and installed in the chimney cap at the top of the chimney. Once positioned, connect the power cord to the side of the insert, plug it into the outlet, and slide the insert back into the opening. Make sure it is centered and level, adjusting with leveling screws if necessary.
The new set of gas or electric logs are installed in the existing fireplace opening. Ensure all components are securely in place.
Pull down the flue vent liner and adaptor, connecting it to the top of the insert to complete the installation.
All gas lines and other connections are verified and secured, giving you confidence in the setup’s safety and functionality.
Installing a Fireplace Insert: Key Details
Working Time: Expect the installation process to take approximately 4 to 6 hours of active work.
Total Time: From start to finish, the entire project can extend to around 6 to 8 hours, allowing for preparation and any necessary adjustments.
Skill Level: This project requires advanced skills, so it’s advisable for experienced DIY enthusiasts or professionals.
Project Cost: The cost can vary significantly, ranging from $700 to $2,000, depending on materials, labor, and the type of insert chosen.
To install a fireplace insert – gather the following essential materials to ensure a seamless process:
Fireplace Insert Kit: This typically includes the insert itself, along with a power cord, vent adaptor, finishing trim, and screws. These components work together to provide a cohesive installation.
Stainless Steel Flue Vent Liner: Choose a durable, stainless steel liner to ensure your chimney efficiently channels smoke out of your home.
Chimney Cap: This piece helps prevent debris, rain, and critters from entering the chimney, enhancing safety and efficiency.
High-Temperature Silicone Sealant: Use this sealant to secure connections and prevent gaps where air could leak, vital for maintaining proper function and safety.
Scrap Cardboard: Handy for protecting floors and surfaces during installation, preventing scratches and damage.
Gas Line Capping Supplies: If capping a gas line, ensure you have a 1/2 inch pipe cap along with pipe dope to securely seal the line.
Each item on this list plays a crucial role in ensuring your fireplace insert is installed safely and functions efficiently. Balancing preparation with the right materials is key to a successful installation.
What are the benefits of a fireplace liner?
The new gas logs are amazing. The benefits are ease of use, remote controls, no clean-up, and high efficiency. But there’s more to consider when upgrading your fireplace experience.
Effortless Integration: Gas logs fit seamlessly into your existing setup, enhancing both the look and functionality of your fireplace without the need for major renovations.
Enhanced Heat Output: With advanced technology, these logs are designed to maximize heat output, comfortably warming your living space. Many models can effectively heat areas ranging from 1,000 to 3,000 square feet.
Cost-Effective Solution: Compared to a full fireplace overhaul, gas logs offer a budget-friendly alternative. They deliver the charm of a traditional fireplace with modern efficiency, saving you money on fuel costs.
Environmentally Friendly: These logs burn cleaner than traditional wood fireplaces, reducing emissions and improving indoor air quality. This makes them a perfect choice for those looking to minimize their environmental impact.
Convenience at Your Fingertips: Enjoy the luxury of controlling your fireplace with a remote, allowing you to adjust settings without leaving your seat. Plus, the lack of ash and soot means no messy clean-up, leaving you more time to relax and enjoy the warmth.
Conclusion:
Transform your home with the simple addition of gas logs, and experience the perfect blend of tradition and innovation.
Even though the old chimney smoke is reduced, it is important to sweep the new liner yearly. The chimney cap and liner build up soot also.
Finally, search for chimney sweep near me for a qualified professional. Require insurance, recommendations and a guarantee for all work.
When your chimney leaks in heavy rain, it is often the result of cracked and separated bricks and mortar. Water freezes the cracks in winter. When the temperatures warm up, the ice thaws and leaves a gap in the mortar and around the flue pipe.
This might seem like a minor issue, but protecting your home from chimney leaks during heavy rain is crucial for several reasons:
Structural Integrity: Leaks can compromise the structural integrity of your home. Water seeping through cracks weakens the brickwork and mortar, potentially leading to more significant damage over time.
Ventilation Efficiency: The chimney is a critical component of your home’s ventilation system. It efficiently directs smoke and harmful gases out of your living space. When leaks occur, they can disrupt this function, posing health risks.
Preventing Further Damage: Ignoring these issues can lead to more severe problems, such as mold growth and internal water damage. Prompt attention is necessary to prevent costly repairs.
By understanding the importance of maintaining a leak-free chimney, you can ensure your home remains safe and sound, even in the heaviest of rains.
We all love spring time. Flowers, bird chirping and warmer weather means mother nature is waking up. In parts of the country, it signifies the “great thaw”. Frozen rivers will expand and flood low areas. Your driveway and steps may show expansion areas from the freeze and thaw.
Chimneys are the same way. Many chimney tops are not slanted properly and water sits on top and seeps into the cracks. When the temperatures freeze, the water does too. As it expands, the brick joints will push apart. This is where the trouble starts.
But that’s not the only issue you might face. Over time, the mortar joints holding the chimney’s bricks or stones can deteriorate. Exposure to the elements weakens the mortar, allowing water to sneak in through the gaps, potentially leading to leaks and structural issues.
Additionally, chimney condensation is a common culprit. Warm, moist air from inside your home can meet the cooler surfaces of the chimney, forming droplets that pool inside. Without proper ventilation, this can become a persistent problem, making a chimney liner a wise investment.
Moreover, the masonry itself can suffer from the forces of nature. Freeze-thaw cycles, moisture, and other environmental factors can cause bricks to crack or spall and mortar to loosen. Regular inspections can catch these issues early, ensuring necessary repairs keep your chimney watertight.
Addressing these factors with proactive maintenance and timely repairs can safeguard your home from the headaches of chimney leaks during heavy rain.
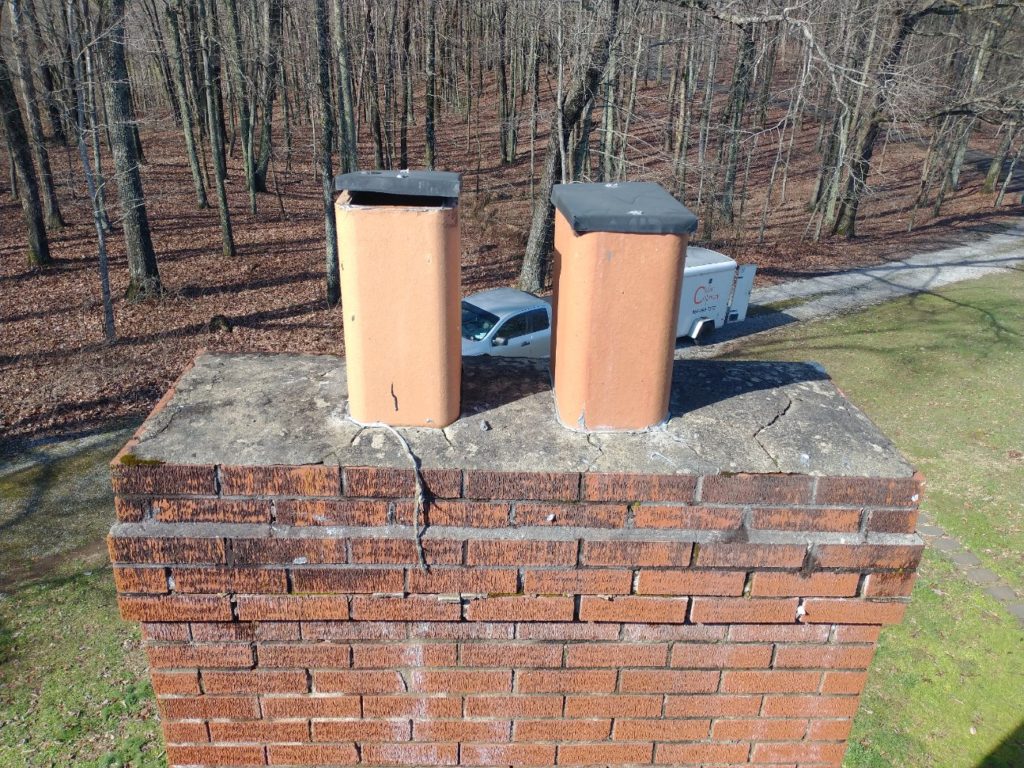
Notice in this "before" picture the cracks in the top portion of the chimney. It leaks in heavy rain! Request Service By Clicking On The Picture.
How do we stop chimney leaks in heavy rains?
The process of stopping chimney leaks in heavy rains is pretty straightforward. First, we clean and scrape any old mortar and chipping off the top and sides of the chimney. Most of the time, we have to add mortar back into a few areas.
Secondly, after the holes are patched and sealed, we coat the area with a sealant designed for chimneys. It will last from 10 to 15 years with periodic inspections.
Chimneys are more than just architectural features; they are vital components of your home’s ventilation system. They ensure that smoke and harmful gases are efficiently directed out of your living space. However, during heavy rain, these structures can often become vulnerable to leaks, potentially leading to significant issues such as water damage, mold growth, and compromised structural integrity.
Addressing these concerns promptly is crucial, and that’s where our specialized sealant comes into play. By applying a durable, weather-resistant barrier, we protect your chimney from the elements, safeguarding your home from the adverse effects of moisture infiltration. Regular inspections ensure the longevity and effectiveness of this protection, keeping your home safe and dry.
To further enhance the protection of your chimney from leaks, consider implementing additional measures:
Waterproofing Chimney Masonry: Over time, the bricks and mortar can become porous, allowing water to seep through. Applying a high-quality waterproofing sealant creates a protective barrier, preventing water penetration and reducing the risk of leaks. Be sure to follow the manufacturer’s instructions for application.
Repairing Mortar Joints: Deteriorated mortar joints can let water enter the chimney structure. The process, known as repointing, involves removing damaged mortar and replacing it with fresh material. Hiring a professional ensures the repairs are done correctly.
Condensation Prevention Tips:
Proper Ventilation: Ensure your home has adequate ventilation to reduce humidity. Exhaust fans in kitchens and bathrooms can help remove excess moisture.
Insulate the Chimney: Insulating the exterior can help regulate temperature and reduce condensation.
Monitor Indoor Humidity: Use a hygrometer to keep humidity levels between 30% and 50%.
Regular Fireplace Use: Regular use warms up the chimney, reducing temperature differences and minimizing condensation.
By incorporating these methods, you can significantly safeguard your chimney against leaks during heavy rains. Remember, regular maintenance and timely repairs are key to ensuring the long-term protection and functionality of your chimney.
Secondly, after the holes are patched and sealed, we coat the area with a sealant designed for chimneys. It will last from 10 to 15 years with periodic inspections.
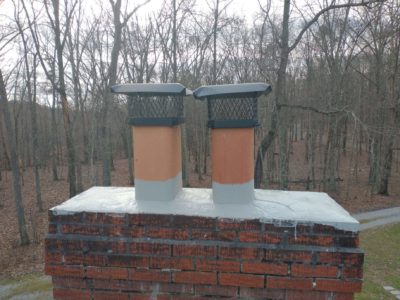
The top picture is the “after” picture all sealed up and ready for another decade. Sometimes, the flues coming up from the firebox are installed without being level or plumb. We can not really change that but the repairs will minimize the look if needed.
Rental cabin fireplaces are at risk without a thorough chimney cleaning. The challenge with rental cabins is the timing required between guest visits. We often have to clean these with only hours to spare before the next guest checks in.
Amazing! This is a real example of a fireplace that did not get a chimney sweep even though it was recommended a year ago. Also, the fire resulted from paper products and “green wood” burning for over a year.
Most rental cabin owners do not understand how many fires are burned in cabins (even in mild temperatures). It does not take very much burning to create creosote buildup in a fireplace flue. We see rental cabins in Gatlinburg, Pigeon Forge and Sevierville Tennessee that do not get the proper chimney sweeping service. These cabins are used all winter long. Also, many visitors do not realize how to start and maintain a proper fire.
They will frequently put combustibles into the fireplace that will cause dangerous creosote build up over the years. Therefore, the cabin requires frequent cleaning of the chimney and fireplace.
A thorough chimney sweep takes less than an hour and provides peace of mind at an affordable price. Why take chances with your largest investment?
Your family’s safety depends on regular maintenance in many areas of your home. Why neglect your fireplace? This is a dirty and dangerous job. DO NOT try to do this yourself unless you acquire the proper training and tools.
Finally, If you live in around our area of east Tennessee, remember, rental cabin fireplaces are at risk without a thorough cleaning.
Schedule A Chimney Sweep
Schedule a cleaning today and rest easy for the coming year. We offer specials in the spring and the fall. Check our webpage for coupons related to chimney sweepings. We also offer military and first responder discounts. Mention this webpage for your discount at the time of your scheduling.
Keep the rental cabins clean and they will produce positive cash flow to you year around.