When looking for an affordable chimney cap installation near me in the Knoxville TN area, look no further. Custom chimney caps are our specialty. We survey, design and fabricate custom chimney caps and covers to fit the top of your chimney.
“Our caps are made from the highest quality steel with a coated paint and sealant to last for decades. Typically, a chimney cap can last anywhere from three to 25 years. This wide range depends on factors like the climate you live in, the material used, and how often you utilize your fireplace.
By choosing a high-quality cap, you already take a significant step toward durability. However, regular inspections and maintenance are key to extending its life.
Why is a Chimney Cap Necessary and What Benefits Does it Provide?
A chimney cap is an essential component for anyone looking to protect and extend the life of their chimney. Here’s why installing one is a smart decision:
Shield Against Nature’s Elements: A chimney cap acts as a barrier, effectively blocking rain, snow, and debris from entering your chimney. This protection is crucial to prevent water damage, which can deteriorate the chimney structure over time.
Wildlife Protection: Unwanted guests like birds and small animals often view chimneys as prime real estate. A cap prevents them from nesting or getting trapped inside, which can cause blockages and other issues.
Fire Hazard Reduction: Sparking embers can escape your chimney and ignite nearby materials. A cap significantly reduces this risk by containing those sparks, making it an important safety feature.
Moisture Management: Continuous exposure to moisture can lead to the deterioration of your chimney flue liner. By keeping excess water out, a chimney cap helps preserve its integrity and prolongs its lifespan.
Energy Efficiency: A capped chimney contributes to better temperature regulation in your home. By minimizing drafts and preventing cold air from entering, it can lead to reduced energy bills, enhancing overall efficiency.
Investing in a chimney cap is not just about protection; it’s about maintaining the value and safety of your home with a simple, efficient solution.
Key Factors Affecting Chimney Cap Lifespan:
Climate: Harsh weather conditions can accelerate wear and tear.
Material: While our steel caps are designed for longevity, other materials may not offer the same resilience.
Usage Frequency: Frequent use of your fireplace can affect the cap’s lifespan.
Investing in a superior product coupled with proper care can ensure your chimney cap remains effective for many years.”
We strive to make the cap and cover blend into the house as close as possible. We also paint the brick and flashing to match the total job if needed.
Why Choose a Chimney Cap?
Protection: Chimney caps are essential for keeping out rain, snow, wildlife, and debris, reducing the risk of chimney fires.
Energy Efficiency: They help in regulating your home’s temperature, potentially lowering energy bills.
Durability: With proper maintenance, a chimney cap can last anywhere from three to 25 years, depending on factors like climate and usage.
Cost Considerations
A standard chimney cap costs about $300 on average, with prices ranging from $75 to $1,000. This variation depends on materials—such as galvanized steel, copper, or stainless steel—size, and any repairs needed. Additional costs may include hiring a chimney sweep to clean the chimney before installation.
We strive to make the cap and cover blend into the house as seamlessly as possible. We also paint the brick and flashing to match the total job if needed.
Installation Expertise
Keep in mind, this is a dangerous job. It is not a project that a typical homeowner wants to take on as a DIY. We are fully secured and tied off with safety equipment on these chimney cap installation projects.
Check out our customer reviews and testimonial page for many happy clients we have helped over the years. Also, Google, Yelp, and Facebook help us get the word out for our locally owned family-run business.
Choosing the Right Cap
For a brick chimney, the best style is one that fits tightly around the chimney’s top with screens to keep animals out. Materials like stainless steel, copper, or custom-fitted aluminum are recommended for longevity and a perfect fit.
The key to a good chimney cap replacement is the quality of the metal and the measurements taken at the beginning. A tight seal for waterproofing materials delivers years of clean, dry fireplaces and chimneys.
Beyond just the cap, incorporating custom chase covers can significantly enhance your chimney’s defense system. These customized elements work together to shield your chimney from harsh weather conditions, ensuring long-term durability. By creating a tailored fit, these solutions prevent moisture infiltration and other environmental threats that could compromise the integrity of your chimney system.
Investing in these custom components not only protects but also prolongs the life of your chimney, offering peace of mind and safeguarding your home investment.
We also provide caps and covers for wood-burning or pellet stoves. The same type of care and installation are provided with both. Of course, the codes for chimneys and flues will always be observed.
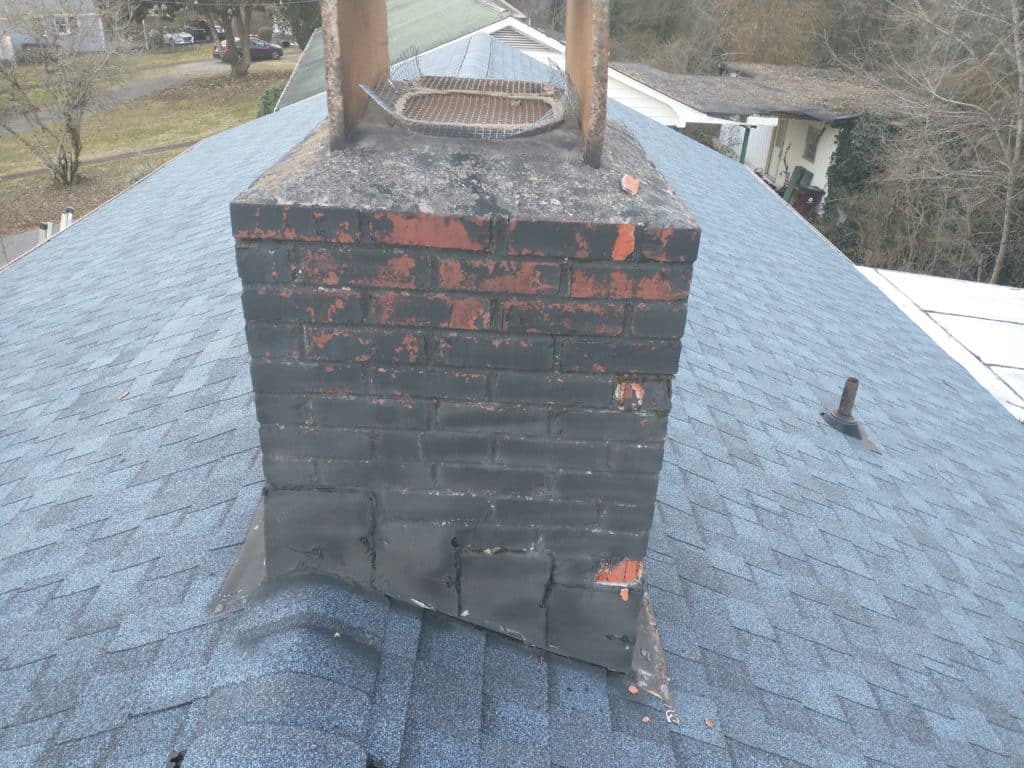
Chimney cap installation before we started.
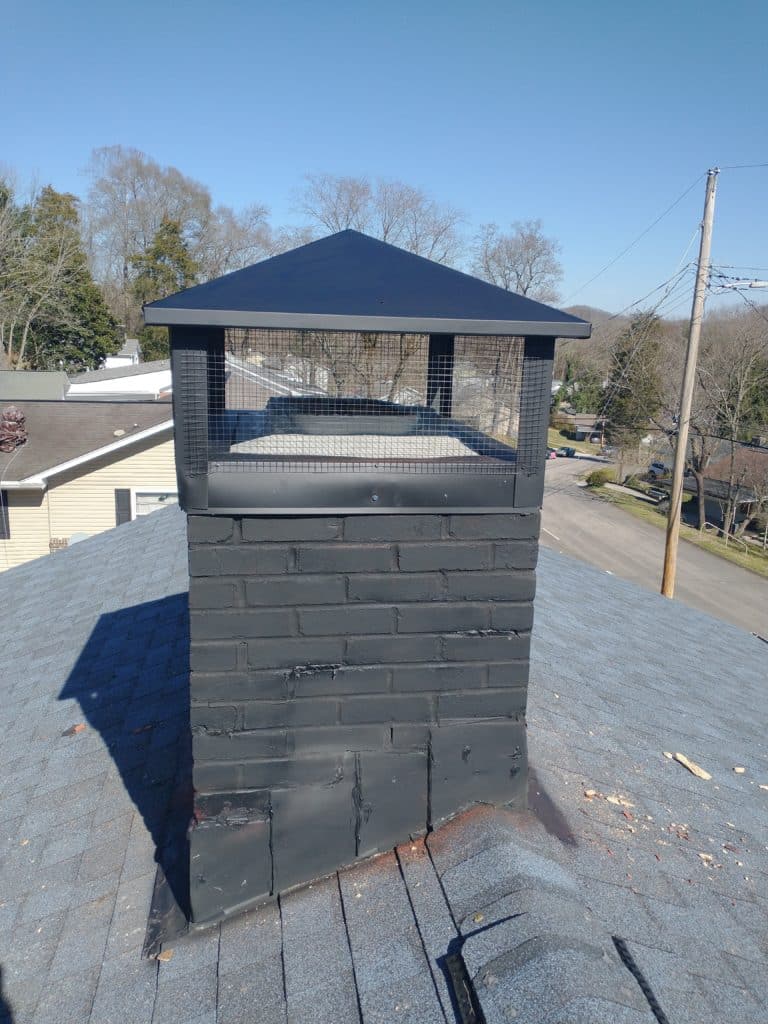
Chimney cap project after we finishted
Key factors
When considering chimney cap replacement and installation, it’s essential to weigh several key factors to ensure a safe and efficient home. The key to a good chimney cap replacement is the quality of the metal and the measurements taken at the beginning. A tight seal for waterproofing materials delivers years of clean, dry fireplaces and chimneys.
Here are some crucial considerations for homeowners:
Element Protection: Choose a cap that effectively keeps out rain, snow, and critters. This protection helps maintain the integrity of your chimney and prevents unwanted guests from entering your home.
Smoke Ventilation: Ensure the design facilitates proper smoke direction. This not only keeps your living space smoke-free but also enhances the efficiency of your fireplace.
Water Damage Prevention: A well-installed cap prevents water from seeping in, protecting the structure from costly water damage.
We also provide caps and covers for wood-burning or pellet stoves. The same type of care and installation are done with both. Of course, the codes for chimneys and flues will always be observed.
By taking these factors into account, homeowners can make informed decisions that enhance the longevity and performance of their chimneys.
Keep in mind, this is a dangerous job. It is not a project that a typical homeowner wants to take on as a DIY. We are fully secured and tied off with safety equipment on these chimney cap installation projects.
Steps:
If you’re determined to proceed, consider these essential steps to install a chimney cap safely and efficiently:
Evaluate Your Needs: Before purchasing a chimney cap, consider the size and type of your chimney. Different materials and designs offer varying levels of protection against rain, debris, and pests.
Choose the Right Cap: Look for a durable cap that fits your chimney’s specifications. Stainless steel and copper options are popular for their longevity and resistance to rust.
Gather the Necessary Tools: Ensure you have all required tools, including a ladder, screwdriver, drill, and safety harness. Proper preparation is key to a smooth installation.
Prioritize Safety: As mentioned, safety is paramount. Use a sturdy ladder and wear a harness when working at heights. Double-check all equipment to prevent accidents.
Follow Installation Instructions: Carefully follow the manufacturer’s instructions for attaching the cap to ensure a secure fit. This usually involves screwing the cap onto the chimney flue.
By following these steps and maintaining a strong focus on safety, you can enjoy the benefits of a properly installed chimney cap, which include improved fireplace efficiency and protection from external elements.
The key to a good chimney cap replacement is the quality of the metal and the measurements taken at the beginning. A tight seal for waterproofing materials delivers years of clean, dry fireplaces and chimneys. We also provide caps and covers for wood burning or pellet stoves. The same type of care and installation are done with both.
Chimney cap benefits
Installing a chimney cap offers several benefits that extend beyond just a quality replacement. Here’s why it’s a wise choice:
Protect Against the Elements: A well-fitted chimney cap keeps out rain, snow, and other debris, preserving the integrity of your chimney structure.
Prevent Unwanted Guests: It acts as a barrier against wildlife such as birds and squirrels that might otherwise take refuge in your chimney.
Enhance Fire Safety: By preventing sparks from escaping, a chimney cap helps reduce the risk of chimney fires.
Moisture Control: It reduces your chimney’s exposure to moisture, which can lead to costly damages if left unchecked.
Energy Efficiency: A chimney cap helps regulate your home’s temperature, potentially reducing energy bills.
By focusing on both quality installation and the numerous advantages, you ensure your chimney remains an efficient and safe part of your home for years to come.
Of course, the codes for chimneys and flues will always be observed.
There isn’t a simple rule of thumb when it’s time for a chimney cleaning. It depends a lot on how often you use your fireplace or stove.
“The National Fire Protection Association recommends that chimneys, fireplaces, and vents be inspected at least once a year for soundness. Also check for freedom from deposits, and correct clearances. Cleaning, maintenance, and repairs should be done if necessary.”
Conducting these inspections is particularly important in the fall or early winter. During spring and summer, chimneys can become home to animal nests, which may obstruct the flue. Such blockages can lead to improper ventilation and increase the risk of dangerous carbon monoxide buildup when you first light your fireplace in the colder months.
If you’ve recently moved into a new home, it’s advisable to schedule a chimney inspection outside of the usual seasonal timeline. This ensures that any hidden issues are addressed before you begin using your fireplace regularly.
By adhering to these guidelines, you can enhance the safety and efficiency of your fireplace, providing peace of mind and warmth throughout the year.
More specific guidance for safety and efficiency
However, more specific guidance is available to ensure your chimney’s safety and efficiency. According to the Chimney Safety Institute of America (CSIA), you should clean your chimney when there is 1/8″ of creosote and/or soot buildup inside the chimney liner. This measurement is crucial as excessive buildup can lead to dangerous chimney fires.
In addition to the inspection, the NFPA also promotes annual chimney cleaning no matter how often you use it. By adhering to these recommendations, you can ensure both the safety and longevity of your chimney and fireplace system."
When it’s time for a chimney cleaning, call a professional that knows exactly how to clean and inspect your fireplace and chimney.
What does NFPA say?
According to The National Fire Protection Association (www.nfpa.org), “The leading factor contributing to home heating fires (27%) was failure to clean, principally from solid-fueled heating equipment, primarily chimneys.”
The problem is that creosote (the tar deposited on chimney walls by wood smoke) can form when unseasoned wood is burned. Also when the air supply is restricted, or/and the chimney temperatures are cooler than normal. Burning unseasoned wood keeps the smoke cooler than seasoned wood because much more energy is used to drive off the water trapped in the logs. A smoky fire without enough oxygen emits lots of unburned tar vapors that can condense inside the fireplace flue and stick to it. This may possibly lead to a chimney fire. You can reduce creosote buildup in your fireplace flue by providing adequate combustion air, which will encourage a hot, clean-burning fire.
When using a wood stove, overloading the firebox with wood in an attempt to get a longer burn time also contributes to creosote build-up. We recommend filling the firebox to around 75% if possible.
Check for creosote build up…
To ensure your chimney and fireplace are in optimal condition, it’s crucial to recognize the signs indicating the need for professional chimney sweep services. Here’s a comprehensive guide to help you identify potential issues and take action:
Unpleasant Odors: If your fireplace emits a campfire-like smell even when it isn’t in use, it might be time for a professional inspection. This odor often signals creosote buildup or trapped debris.
Poor Fire Performance: Notice that fires aren’t burning as robustly as they used to? Difficulty in starting or maintaining a fire can be due to restricted airflow, often caused by a clogged chimney.
Smoke in Your Space: When smoke begins to fill the room despite the flue being open, it indicates a blockage or improper ventilation.
Visual Signs of Creosote: The presence of a black damper or oily marks on the fireplace walls suggests creosote accumulation. This substance can appear as flaky soot or hard, shiny deposits in advanced stages.
Animal Activity: Listen for unusual noises or check for signs of nesting. Birds and squirrels often make homes in chimneys, obstructing airflow and creating hazards.
How to check for creosote buildup
To check for creosote yourself, first, make sure there’s no downdraft from the chimney. If you feel an airflow, open a door or window on the same floor as the fireplace until the downdraft stops or reverses and air flows up (tape tissue to the fireplace opening and watch its movement). Then, while wearing goggles and a basic disposable dust mask, take a strong flashlight and shine the light near the top of the firebox, in the smoke chamber, and around the damper. And check the fireplace flue too, especially on exterior chimneys. Creosote builds up faster than on interior chimneys because of lower outside temperatures.
Take your fireplace poker and scratch the black surface above the damper (smoke chamber). If the groove you scratch in the creosote is paper thin, no cleaning is needed. However, if it’s 1/8 in. Thick, schedule a cleaning soon. If you have 1/4 in. Of creosote, do not use the fireplace again until it is cleaned – a chimney fire could occur at any time.
By staying vigilant and conducting regular checks, you can ensure your fireplace remains a safe and efficient source of warmth and comfort.
What Does Smoke Filling the Room from the Fireplace Indicate?
When you notice smoke enveloping a room from your fireplace, it’s a clear sign that something is amiss with your ventilation system. Here are some common reasons why this might happen:
Flue Obstruction: Even with the flue open, obstacles like creosote buildup, bird nests, or debris may block the chimney. This prevents smoke from escaping properly, causing it to back into the room.
Improper Flue Size: If the size of the flue doesn’t match the fireplace, it might fail to draw smoke out efficiently. A flue that’s too small for the fireplace won’t allow sufficient airflow. An oversized one might not create the necessary draft.
Negative Air Pressure: Homes with tightly sealed windows and doors can experience negative air pressure. This may force smoke to seek easier escape routes into the living spaces rather than up the chimney. Installing a fresh air intake can often resolve this issue.
Damp Wood: Using wood that hasn’t been properly seasoned creates more smoke than the chimney can handle. Excess smoke from wet wood can overwhelm even a well-functioning chimney system.
Downdrafts: Weather conditions can sometimes cause downdrafts, where wind pushes air back down the chimney. A chimney cap can help mitigate this issue by deflecting the wind.
If you’re encountering smoke filling your room, it might be time to inspect your chimney system. Also, check your wood quality, or consider adjustments to your home’s ventilation. Always prioritize safety by verifying these elements to ensure your fireplace operates smoothly and safely.
Can I do this when it is time for a chimney cleaning?
You could try to remove the creosote yourself, but why not save on materials and get a thorough job, call us. We are knowledgeable, and trained to recognize deterioration or venting problems, and able to advise you regarding the chimney’s condition. Proper care and maintenance of your chimneys, woodstoves and fireplaces can help protect you and your family from unnecessary fires and carbon monoxide poisoning.
Finally, when it is time for a chimney cleaning, do not try to do this yourself. It is a dangerous job with unique tools. Call us and let our pros do it right, safe and cost effective.
How to install fireplace inserts is one of our top questions we receive. Fire place inserts convert wood burning fireplaces to an electric or gas log fireplace. Once fireplace inserts are installed, the existing chimney will not longer need aggressive cleaning. The only maintenance for the inserts is a chimney sweep once a year.
Over time, a traditional wood-burning chimney builds up soot. If not cleaned regularly by a professional chimney sweep, this build-up can start fires. Many families choose gas logs or electric fireplaces to maintain the look and feel of a fire as our homes are modernized.
When Should You Install a Fireplace Insert?
Installing a fireplace insert can be a savvy decision if you own an existing masonry fireplace that’s outdated or inefficient. Here’s when you should consider an upgrade:
Cost Efficiency: If you want an affordable alternative to remodeling or replacing a traditional fireplace, inserts are a great option. They offer a cost-effective way to breathe new life into your old setup.
Improved Efficiency: Are you concerned about energy efficiency and cleaner air in your home? Inserts provide a more fuel-efficient burn and reduce smoke emissions compared to open fireplaces, making them a greener choice.
Existing Venting System: With a masonry fireplace, you already have a built-in venting system, as inserts utilize the existing chimney, which can simplify installation.
DIY Possibility: For those who enjoy DIY projects and have a flair for carpentry, installing a fireplace insert might be within reach. No specialized tools are needed for the basic assembly. However, expertise in working safely on a ladder or roof is necessary for this task.
Electrical Needs: Remember, though, that you’ll need a power outlet within the old fireplace. Unless you’re a certified electrician, you’ll need to hire one for this part of the installation.
Consider these points if you’re ready to enhance your fireplace’s performance and style.
However, if you’re considering a fireplace insert, several safety considerations are crucial to ensure a secure installation and operation. Firstly, measure the exact height, width, and depth of your fireplace opening. This ensures the insert fits perfectly, as each brand and model has its own specifications and safety criteria.
Safety Guidelines
Manufacturer’s Instructions: Follow the manufacturer’s guidelines to avoid potential fire hazards. Understanding the required safe distance from combustibles is essential before purchasing and installing the insert.
Ventilation: Proper ventilation is critical. Ensure all necessary vents are installed correctly, which may involve working at high elevations. Always work in favorable weather conditions and use non-slip footwear for added safety.
Stable Setup: When setting up a ladder or any equipment, ensure it’s on stable ground to prevent accidents.
By blending traditional charm with modern safety standards, you can enjoy the warmth and ambiance of a fireplace without compromising on safety.
Many vendors offer remarkably real gas logs. Also, some have remote controls and thermostats to regulate the temperature in the home.
Important steps to install an insert:
When we are asked how to install fireplace inserts, we inform them in order to convert a wood burning fireplace into gas logs or a vented fireplace, there are several steps to take:
The most important first step is a chimney sweep by a professional (do not go past this point until it is done!)
The old fireplace grate is removed and recycled.
The chimney professional will inspect and repair any fire brick and defects in the masonry.
A fireplace insert is installed. This insert is lowered from the chimney top or in some cases pushed up through the chimney, ensuring a snug fit within the existing structure.
Begin by attaching the vent adaptor to the end of the flue vent liner. Lay down a piece of scrap cardboard to protect hardwood or tile surfaces in the hearth area while maneuvering the insert. Place the insert on the cardboard to prevent any damage.
The insert is cut and installed in the chimney cap at the top of the chimney. Once positioned, connect the power cord to the side of the insert, plug it into the outlet, and slide the insert back into the opening. Make sure it is centered and level, adjusting with leveling screws if necessary.
The new set of gas or electric logs are installed in the existing fireplace opening. Ensure all components are securely in place.
Pull down the flue vent liner and adaptor, connecting it to the top of the insert to complete the installation.
All gas lines and other connections are verified and secured, giving you confidence in the setup’s safety and functionality.
Installing a Fireplace Insert: Key Details
Working Time: Expect the installation process to take approximately 4 to 6 hours of active work.
Total Time: From start to finish, the entire project can extend to around 6 to 8 hours, allowing for preparation and any necessary adjustments.
Skill Level: This project requires advanced skills, so it’s advisable for experienced DIY enthusiasts or professionals.
Project Cost: The cost can vary significantly, ranging from $700 to $2,000, depending on materials, labor, and the type of insert chosen.
To install a fireplace insert – gather the following essential materials to ensure a seamless process:
Fireplace Insert Kit: This typically includes the insert itself, along with a power cord, vent adaptor, finishing trim, and screws. These components work together to provide a cohesive installation.
Stainless Steel Flue Vent Liner: Choose a durable, stainless steel liner to ensure your chimney efficiently channels smoke out of your home.
Chimney Cap: This piece helps prevent debris, rain, and critters from entering the chimney, enhancing safety and efficiency.
High-Temperature Silicone Sealant: Use this sealant to secure connections and prevent gaps where air could leak, vital for maintaining proper function and safety.
Scrap Cardboard: Handy for protecting floors and surfaces during installation, preventing scratches and damage.
Gas Line Capping Supplies: If capping a gas line, ensure you have a 1/2 inch pipe cap along with pipe dope to securely seal the line.
Each item on this list plays a crucial role in ensuring your fireplace insert is installed safely and functions efficiently. Balancing preparation with the right materials is key to a successful installation.
What are the benefits of a fireplace liner?
The new gas logs are amazing. The benefits are ease of use, remote controls, no clean-up, and high efficiency. But there’s more to consider when upgrading your fireplace experience.
Effortless Integration: Gas logs fit seamlessly into your existing setup, enhancing both the look and functionality of your fireplace without the need for major renovations.
Enhanced Heat Output: With advanced technology, these logs are designed to maximize heat output, comfortably warming your living space. Many models can effectively heat areas ranging from 1,000 to 3,000 square feet.
Cost-Effective Solution: Compared to a full fireplace overhaul, gas logs offer a budget-friendly alternative. They deliver the charm of a traditional fireplace with modern efficiency, saving you money on fuel costs.
Environmentally Friendly: These logs burn cleaner than traditional wood fireplaces, reducing emissions and improving indoor air quality. This makes them a perfect choice for those looking to minimize their environmental impact.
Convenience at Your Fingertips: Enjoy the luxury of controlling your fireplace with a remote, allowing you to adjust settings without leaving your seat. Plus, the lack of ash and soot means no messy clean-up, leaving you more time to relax and enjoy the warmth.
Conclusion:
Transform your home with the simple addition of gas logs, and experience the perfect blend of tradition and innovation.
Even though the old chimney smoke is reduced, it is important to sweep the new liner yearly. The chimney cap and liner build up soot also.
Finally, search for chimney sweep near me for a qualified professional. Require insurance, recommendations and a guarantee for all work.